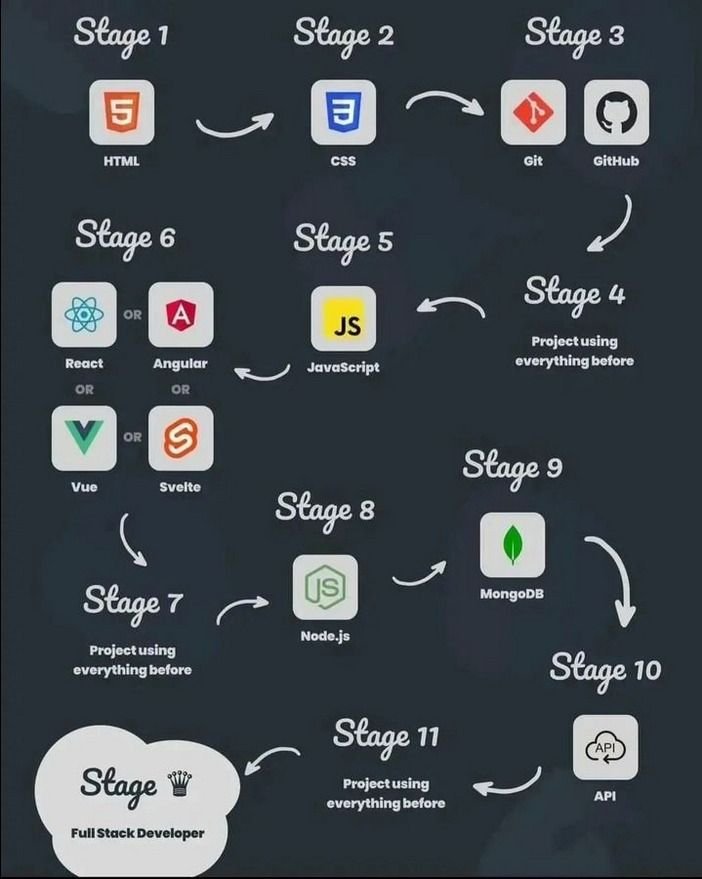
Creating a full-stack web application from scratch is an impressive way to demonstrate your skills as a developer. This guide will take you through each phase of the development process, from setting up your development environment to deploying your application.
Table of Contents
1. Introduction to Full-Stack Web Development
2. Tools and Technologies Required
3. Setting Up Your Development Environment
4. Backend Development with Node.js and Express
5. Database Management with MongoDB
6. Frontend Development with HTML, CSS, and JavaScript (React)
7. Connecting the Frontend and Backend
8. Testing Your Application
9. Deploying the Full-Stack Web Application
10. Conclusion
1. Introduction to Full-Stack Web Development
Full-stack web development involves working with front- and back-end technologies to build a complete web application. The frontend is responsible for the user interface, while the backend manages data and handles the server-side logic. A full-stack developer has the ability to build both.
In this guide, we will focus on building a web application using the **MERN stack**, which consists of MongoDB (database), Express.js (backend framework), React (frontend framework), and Node.js (runtime environment).
2. Tools and Technologies Required
Before starting, let’s gather the essential tools and technologies for the development process:
Node.js: A JavaScript runtime for building backend applications.
Express.js: A web application framework for Node.js to handle routing and middleware.
MongoDB: A NoSQL database for storing data.
React.js: A popular JavaScript library for building user interfaces.
Git: For version control.
Postman: For testing APIs.
Visual Studio Code (VS Code): A code editor for writing and managing code.
3. Setting Up Your Development Environment
Installing Node.js and NPM
Download and install Node.js from the official site (https://nodejs.org/).
Verify the installation by typing `node -v` and `npm -v` in your terminal.
Installing MongoDB
Download MongoDB from the official site (https://www.mongodb.com/) and follow the setup instructions.
Installing Git
Install Git from the official site (https://git-scm.com/), and configure your username and email in the terminal:
“`
git config –global user.name “Your Name”
git config –global user.email “you@example.com”
“`
4. Backend Development with Node.js and Express
Step 1: Initialize the Project
Create a new directory for your project and navigate into it:
“`bash
mkdir fullstack-app && cd fullstack-app
“`
Initialize a new Node.js project:
“`bash
npm init -y
“`
Step 2: Install Express
Install Express.js:
“`bash
npm install express
“`
Step 3: Create a Basic Server
In your project directory, create a `server.js` file and add the following code to create a basic Express server:
“`javascript
const express = require(‘express’);
const app = express();
app.get(‘/’, (req, res) => {
res.send(‘Hello, Full-Stack World!’);
});
const PORT = process.env.PORT || 5000;
app.listen(PORT, () => console.log(`Server running on port ${PORT}`));
“`
Step 4: Test Your Server
Run the server with:
“`bash
node server.js
“`
Open your browser and navigate to `http://localhost:5000`. You should see “Hello, Full-Stack World!”.
5. Database Management with MongoDB
Step 1: Install Mongoose
Mongoose is an object data modeling (ODM) library for MongoDB and Node.js. Install it by running:
“`bash
npm install mongoose
“`
Step 2: Connect MongoDB to Your Application
In your `server.js` file, add the following to connect to MongoDB:
“`javascript
const mongoose = require(‘mongoose’);
mongoose.connect(‘mongodb://localhost:27017/fullstackapp’, {
useNewUrlParser: true,
useUnifiedTopology: true
})
then(()=> console.log(‘MongoDB connected…’))
.catch(err => console.log(err));
“`
Step 3: Create a Model
– Define a simple model for storing user data:
“`javascript
const User = mongoose.model(‘User’, new mongoose.Schema({
name: String,
email: String
}));
“`
6. Frontend Development with HTML, CSS, and JavaScript (React)
Step 1: Create React App
In the terminal, navigate to the root directory of your project and run:
“`bash
npx create-react-app client
“`
Step 2: Create Components
Inside the `src` folder, create components for handling different parts of the application, such as:
**App.js**: The main component.
**Header.js**: The header component.
**Form.js**: A form to collect user input.
Step 3: Styling Your Application
Use CSS to style your application by creating a `styles.css` file and importing it into your React components.
7. Connecting the Frontend and Backend
Step 1: API Endpoint
In’server.js’`, create an API endpoint that your React frontend can consume:
“`javascript
app.post(‘/api/users’, (req, res) => {
const { name, email } = req.body;
const newUser = new User({ name, email });
newUser.save()
.then(user => res.json(user))
.catch(err => res.status(500).json({ error: ‘Failed to create user’ }));
});
“`
Step 2: Making API Requests from React
In your React app, use `fetch` or `axios` to make requests to your backend:
“`javascript
const submitForm = async (formData) => {
const response = await fetch(‘/api/users’, {
method: ‘POST’,
headers: { ‘Content-Type’: ‘application/json’ },
body: JSON.stringify(formData),
});
const data = await response.json();
console.log(data);
};
“`
8. Testing Your Application
Testing is crucial to ensuring your application functions correctly. Use tools such as:
Jest: For unit testing.
Postman: For testing your API endpoints.
Run your tests frequently to catch bugs and ensure everything works as expected.
9. Deploying the Full-Stack Web Application
Once you’ve built and tested your application, it’s time to deploy it. Popular platforms include:
Heroku: For Node.js applications.
Netlify: For React frontend.
You must configure environment variables and set up your pipeline for a seamless deployment experience.
10. Conclusion
Building a full-stack web application from scratch can be challenging, but it’s an incredibly rewarding process that hones your development skills. By mastering both frontend and backend technologies, you can create scalable, dynamic web applications that deliver real value. This guide provides a foundation, but there’s much more to explore. Keep building, learning, and innovating!


